Violin Making
We often get asked a lot of questions about how we go about making an instrument, the woods we use and how long it all takes.
To help answer some of those, and to shed some light on the construction process, this page will feature pictures and some information about the various processes and the tools used.
The method we use follows the Italian tradition as set out by the great cremonese makers. All of our instruments are made entirely by hand using rare old tonewoods.
Here Dave Slight is making a Guarneri Del Gesu model violin.
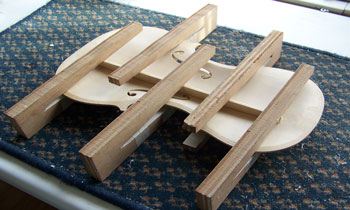
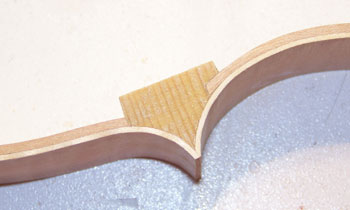
The first stage involves making the ribs. The ribs themselves are sawn into thin strips from a block of maple and planed to approx 1mm thick. Spruce blocks which will hold the ribs together at the corners, neck and endbutton are fitted to the mould and carved to shape. The ribs are bent round a heated iron and then glued to the blocks. The style of mould I'm using is called and internal mould. Accurate work at this stage is essential, the final shape of the instrument will be determined by the outline of the ribs.
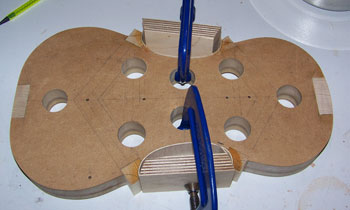 
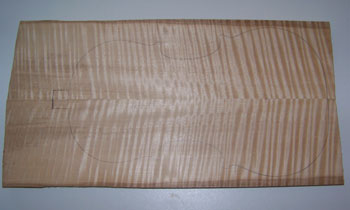
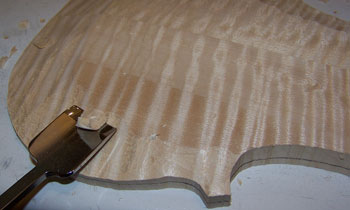
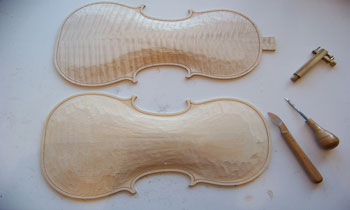
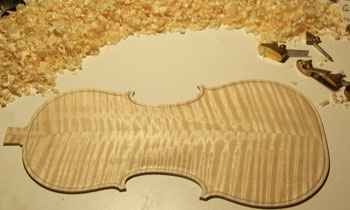
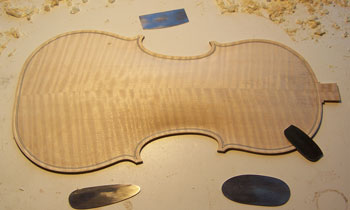
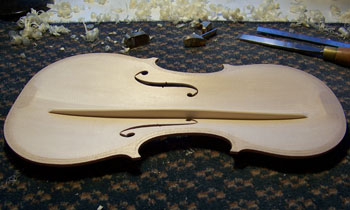
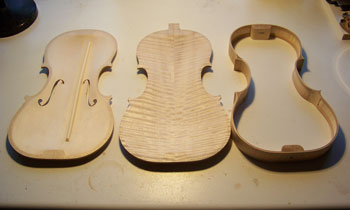
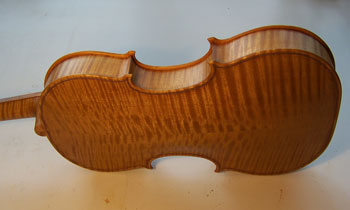
While the ribs are under way, the back and belly have been prepared and jointed. The belly is made from Alpine spruce and the back from Bosnian maple. Once the ribs have been completed, the back and belly outlines can be marked out using a spacer to determine the edge overhang. After both are marked out, they are carefully sawn to shape. The darker areas visible on the belly where it has not been planed are due to the age of the wood. All the wood we use has been seasoned for many years, in this case for around 30 years. The dark bands will be removed in the carving process.
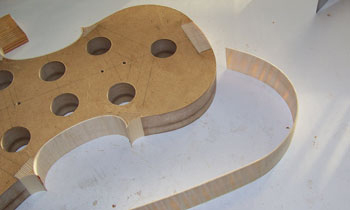
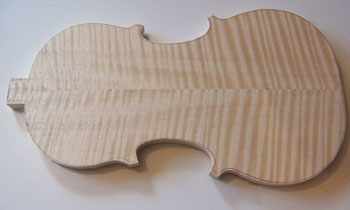
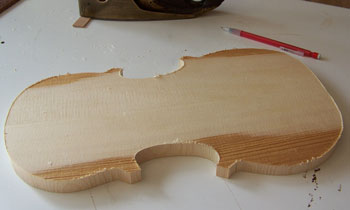
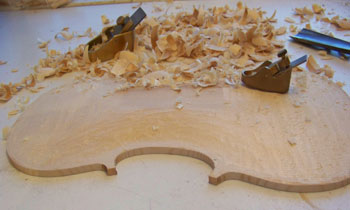
Once they have been sawn out rough carving can begin. This is an initial stage to remove the bulk of the excess wood before shaping the final outline.
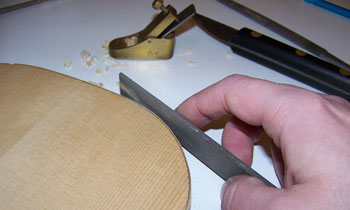
I use knives, thumbplanes, rasps and files to refine the edge to it's finished shape.
 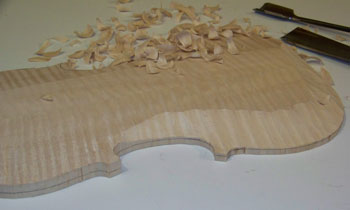
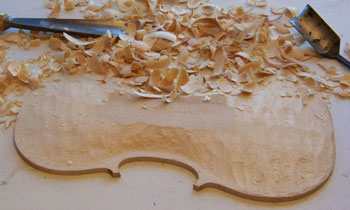
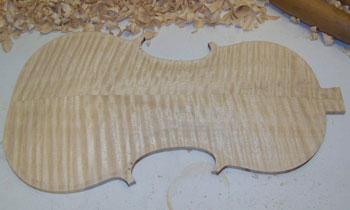
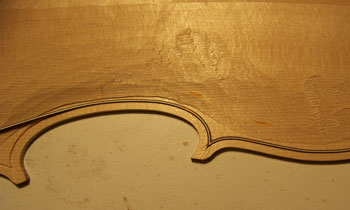
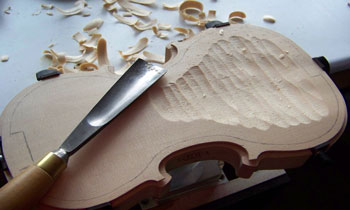
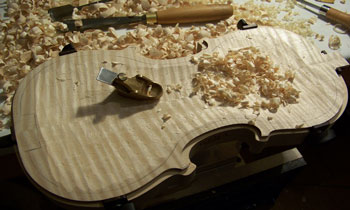
The bulk of the arching is then finished with gouges which leave a rough texture, the shape is refined using small special purpose planes called thumb planes. As can be seen in the pictures there is quite a lot of wood to remove. The shape of the arching is quite complex and it takes a lot of skill to get it right. At this point I am not trying to get the shape completely finished, I will do that once the purfling has been inlaid around the edge.
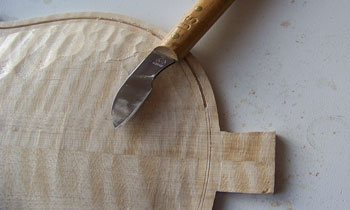
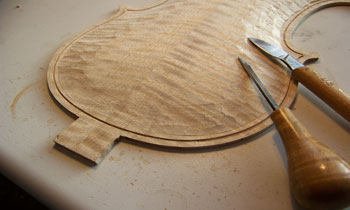
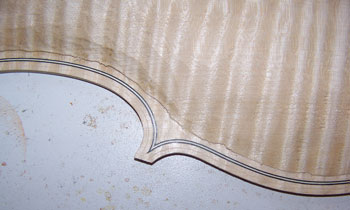
The purfling is made up from three strips of wood, and is inlaid into a channel which runs around the edge of the violin. The purpose of the purfling is not purely decorative, it helps to prevent larger cracks spreading on the back or belly when the edge is damaged.
A brass marking tool is used to lightly scribe two parallel lines which follow the shape of the outline. Using the scribe lines as a guide, the channel for the purfling is then cut out freehand with a knife. This is very delicate work which requires a great deal of skill, patience and a steady hand, any irregularities at this stage will be visible on the finished instrument. To inlay both the back and belly I will need to make around three metres of purfling. The purfling strips must be carefully mitred to join perfectly in the corners.
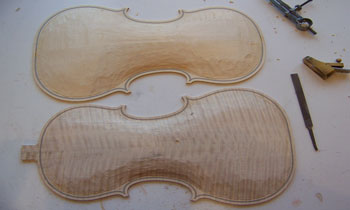 
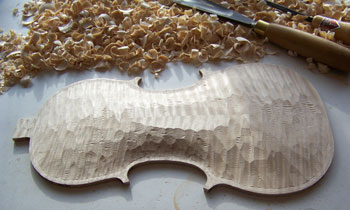
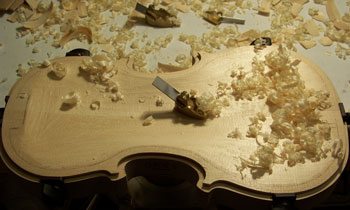
Once the purfling has been glued in place the edge can be fluted using a gouge, and the arching finished off. As most of the rough arching was done before the purfling, it now remains to shape the arching and the fluting into a smooth continuous shape and blend everything together. Thumb planes are used for this job.
Although it may seem a simple procedure, it takes many hours to get the shapes correct and nicely finished ready for scraping.
To smooth out the marks left by the planes, and to bring the arches to a finished state, steel scrapers are used. Scrapers are flat pieces of steel 0.6mm - 0.8mm thick, which are used to literally scrape the surface smooth and remove all the irregularities, they are sharpened to cut the wood rather than abrade it. This is a very traditional way of finishing fine woodwork, and leaves a superior finish compared to abrasives.
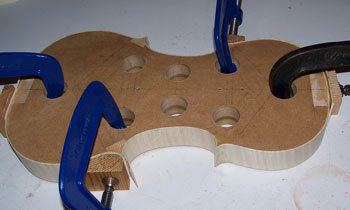
Now that the back and belly are pretty much finished externally, the inside needs to be hollowed out. A margin is left flat around the edge of the back and belly to allow the rib section to be glued on later.
The back can be almost be finished at this stage, although there is still quite a bit more work to be done to the belly. After it is thicknessed the soundholes need to be cut, and the bass bar fitted.
Initial hollowing is done with the same gouge used for the arching, before carefully planing and scraping the wood to it's final thickness. It is this work which will largely be responsible for the tone of the violin.
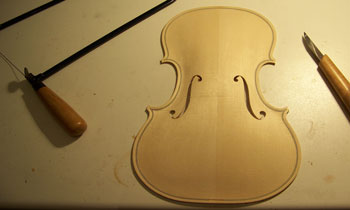
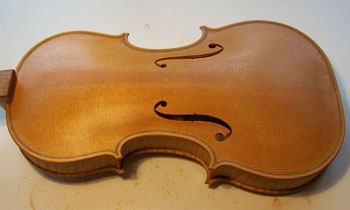
After the belly has been hollowed out and thicknessed, the soundholes can be marked in position and sawn out. A template is used to mark the outline of the soundholes, once the correct position has been established.
The design of the soundhole can alter the flexibility of the top, and in turn how the belly will vibrate. The pattern of soundhole I'm using is taken from a late model Del Gesu, which is characteristically long.
Once the soundholes are marked out, a small hole is drilled through each one to allow the saw blade to pass through. I use a piercing saw for this which has an extremely fine blade. After I have sawn out the bulk of the waste wood, I use a very sharp, thin knife to trim the soundhole to it's finished shape. It takes a lot of careful cutting to give the soundholes a balanced and symetrical appearance.
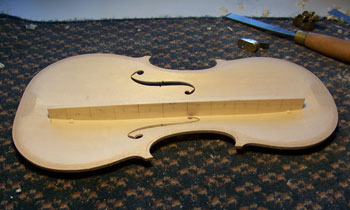
With the soundholes now completed, the position of the bassbar can be established. The function of the bassbar is to help distribute vibrations through the body to emphasise the lower frequencies, and also to support the belly. The bar is made from best quality spruce.
Fitting the bar requires a high degree of precision, to work properly it must fit the inside of the belly perfectly. The inside shape of the belly has compound curves in both directions which can make fitting a tricky operation. I use a chisel and a small thumbplane to fit the bar. Lightweight wooden clamps are used to hold the bar in position while the glue dries. Once glued, the bar can be shaped and tuned.
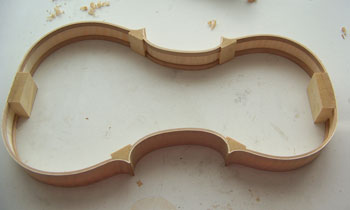
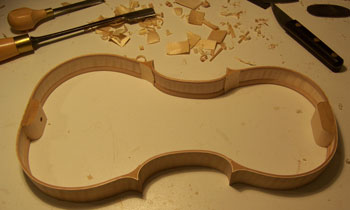
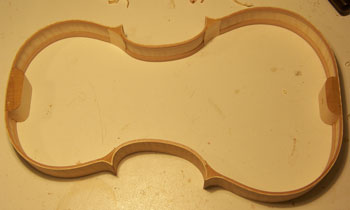
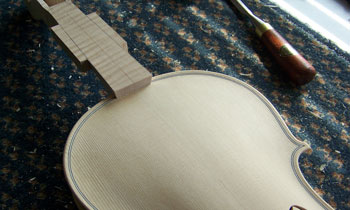
Before the body can be assembled, the ribs need to be removed from the mould, have the linings fitted and the blocks cut to their finished shape.
The ribs themselves are far too thin to hold the back and belly together. To increase the gluing surface, strips of wood are added called linings. The linings will strengthen the ribs and provide the bulk of the gluing surface that the back and belly are fixed to.
Once glued in place they are shaped to reduce the amount of excess wood.
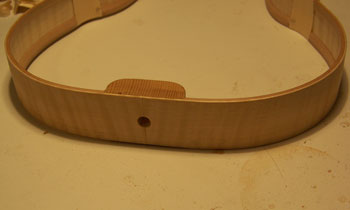
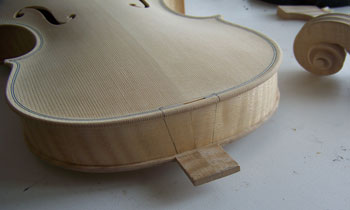
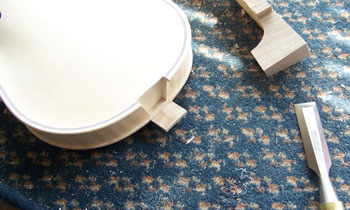
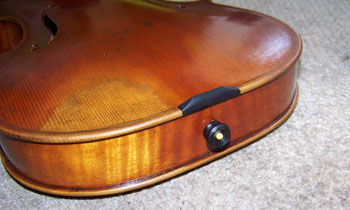
After the linings are finished the corner and endblocks can also be cut back to remove any excess wood. The hole for the endbutton is also drilled at this point.
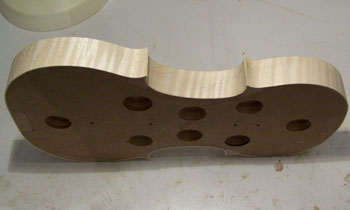
The final job to be done before the body can be assembled, is to carefully round the edges of both the back and belly. For this I use a knife and a file, before finishing off with a scraper.
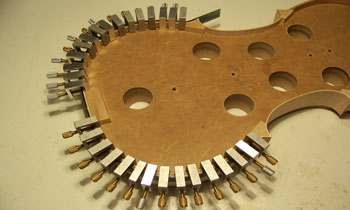
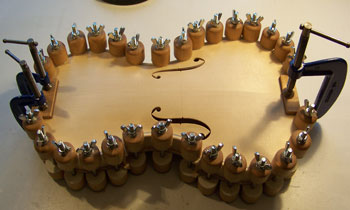
The back will be glued to the ribs first. Before gluing, I check the fit to ensure that the edge overhang is correct all round, the ribs are still flexible and can be adjusted slightly if required. Wooden clamps called spool clamps are used to hold the back in place while the glue dries, at the upper and lower blocks steel clamps are used. The belly is glued on using the same method.
This completes the work to the body until it is time to fit the neck.
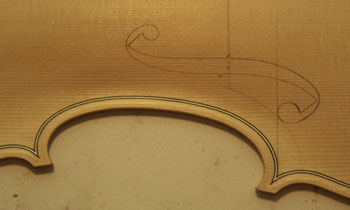
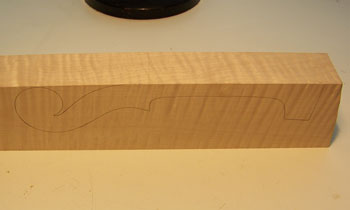
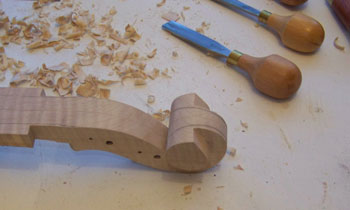
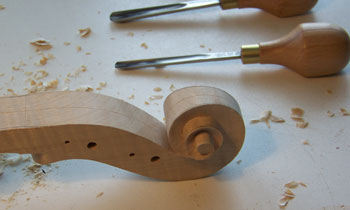
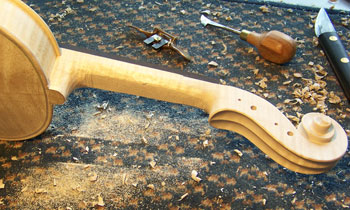
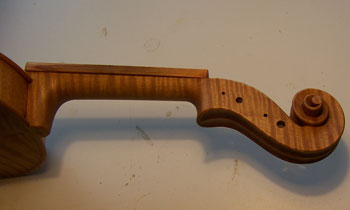
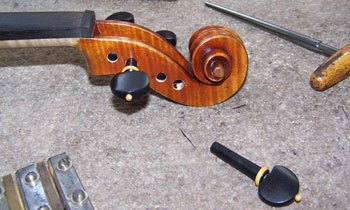
On a prepared block of Maple which matches the body, the scroll is marked on both sides ready for sawing. Once roughly sawn out of the block, chisels and gouges are used to remove the waste before shaping up the final outline with rasps and gouges.
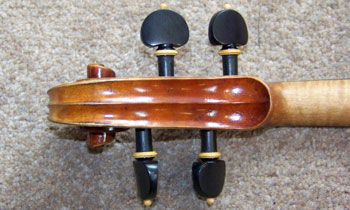
At this stage the peg holes can be drilled. It is important that the position of the pegs is carefully thought out, incorrect positioning can mean that the strings will foul some of the other pegs in the pegbox, which will result in tuning problems and premature string breakage. Consideration needs to be given to the spacing between the pegs, if they are too close together there will not be enough space for the knuckles while tuning.
 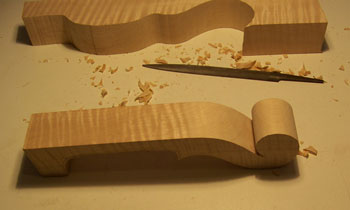
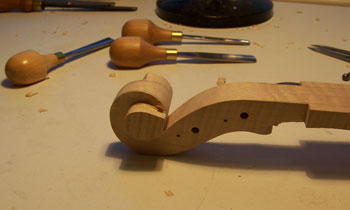
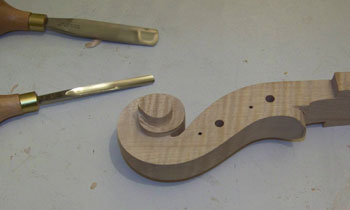
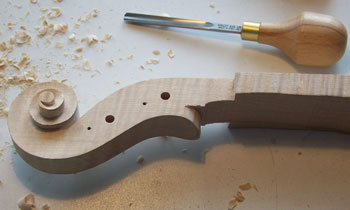
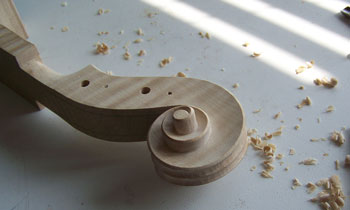
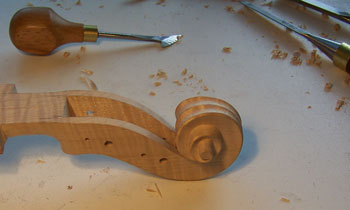
Carving of the scroll begins with the sides of the pegbox, once these are finished I move onto carving the volute and finish at the eye.
It takes a steady hand and a good eye to carve a scroll properly, all of the lines must be flowing and both sides of the scroll must be symmetrical. All of the carving is done with gouges, I favour a type with short blades and stubby handles as they give me more control over the fine details. Once the eye is carved, all of the carved surfaces are finished off with a scraper.
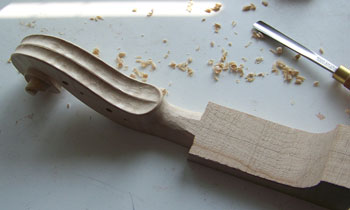
The fluting is carved along the back of the pegbox and around the front of the scroll, before cutting the pegbox. Great care is needed at this point, the scroll is now quite light and delicate. With all of this done, the final job is to apply the chamfer to the edges, this softens the outline and also protects the edges.
The neck is set into the body in a tapered mortice and glued in place.
Fitting the neck can be a tricky operation as there are a lot of factors to get right. It must be exactly in-line with the centre of the body, have the correct angle for the bridge projection, the correct length to the nut and also the right amount of upstand above the body.
A saw is used initially to open up the mortice, before cutting the joint with chisels. When everything is perfect, it is glued in place and left to dry for a day.
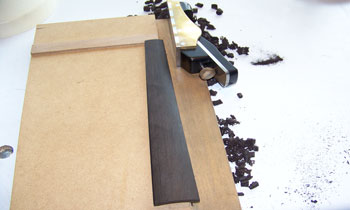
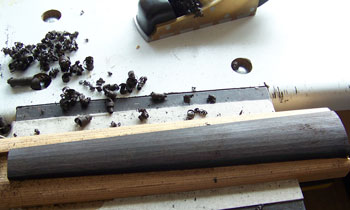
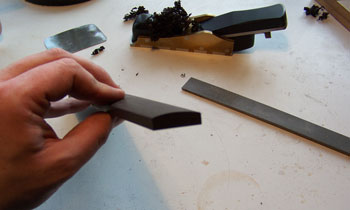
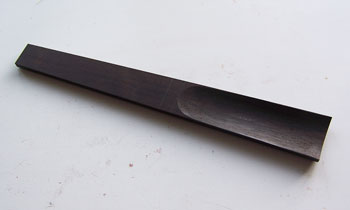
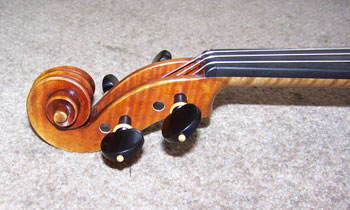
Before the neck can be shaped up and the violin completed, the ebony fingerboard is made. Ebony can be a difficult wood to deal with, it is hard, brittle and blunts tools very quickly. Sadly it is becoming hard to find high quality ebony any more, luckily we have a large stock of old ebony planks to choose from.
A template is used to mark out a blank, before sawing it out and planing the edges to the correct dimensions. The radius is then planed onto the top and finished with a scraper.
Finally the free end of the underside is hollowed out to reduce weight, a thick heavy board would negatively affect the response of the instrument quite significantly.
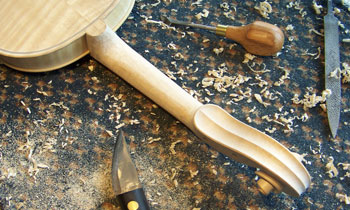
The final part before the violin is complete is to shape the neck and finish the button. The neck is the primary contact point for the player, so a good neck shape which is neither too thick or too thin, and accommodates easy movement of the thumb is important. The sides of the fingerboard are shaped into the neck, to provide a seamless flowing feel. The neck shaft is slightly tapered from the nut to the heel.
Initial carving is done with knives to remove the bulk of the waste wood quickly. A spokeshave, rasps, files and scrapers are used to refine the neck shape. As the heel is carved the, final shape of the button can be marked out and carefully trimmed to shape. Once done, the neck can be carefully sanded to give a smooth playing surface.
Before varnishing can take place, the fingerboard is removed to allow better access to the belly. A wooden cap is used to cover the gluing surface of the neck while the varnish work takes place.
The first part of the varnishing process is to apply the ground. This seals and protects the wood, in addition to giving a beautiful golden colour. The ground is applied in several stages from a number of different components.
On many old instruments from the 17th and 18th centuries the main coloured varnish has completely worn away in places to reveal the ground, yet it still continues to protect and highlight the beauty of the wood.
 After the ground has dried, the colour coats can be applied. The varnish I'm using is an oil one, and the pigments to colour it are made from the roots of the madder plant.
Madder is a very traditional colourant and has been used for centuries, the roots are treated to extract the colour which can then be ground into the varnish. Several colour coats will be needed to obtain the required depth of colour.
Oil varnishes are very slow to dry, and it takes several days for each coat to dry before the next can be applied.
For this instrument I am creating an antiqued appearance which is very time consuming to do. Once all the coats have been applied, the violin will need to dry for a few months before the varnish will be hard enough, then I can set it up and play it.
 The bottom nut is made from ebony, it supports the tailpiece and prevents the soft spruce of the belly from being damaged by the tailgut. At this stage I will also fit the endbutton into the tapered hole already drilled through the ribs and endblock.
Once the fingerboard has been reglued to the neck, I make the final adjustments to it's shape, before setting the height of the top nut and making the string grooves. The grooves need to be gauged correctly to the strings, too wide could lead to buzzing and too narrow would pinch the strings and cause them to break.
The pegs are fitted using special tools, which will cut the shank of the peg to the same taper as that of the reamer used to make the holes through the scroll. This must be done carefully to avoid tearing the brittle ebony of the pegs. I take great care to ensure that all of the pegs are a perfect fit before trimming the ends and drilling the string holes through the shanks.
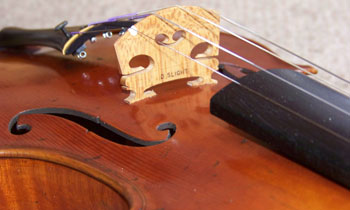
The fitting of the bridge and soundpost, along with the shaping of the fingerboard and nut will largely be responsible for the playability of the instrument. The difference it makes when these parts are all optimally adjusted cannot be underestimated. I spend a great deal of time fitting both the soundpost and bridge.
The soundpost is made from spruce and is fitted inside the body just behind the treble foot of the bridge. The ends of the soundpost must be carefully cut to the same shape as the inside arching of the back and belly. Special tools are used to position the post and check the fit. I use a knife to trim the post until I have the correct length, the tension of the post when installed is critical.
It takes a lot of skill to make a fine bridge, many factors must be balanced in order to obtain the best tone. I use knives, small thumbplanes and files to shape the bridge. Once the feet have been cut to perfectly follow the arch of the belly, I can move onto establishing the string heights and also the radius of the top. The radius of the bridge is very important, there must be enough clearance between the individual strings, but too much would make string crossing and fast passages very difficult to play.
After setting the string heights I tune the bridge by removing small amounts of wood around the feet, ankles and kidneys of the bridge. I also alter the thickness of the bridge in specific areas to control the tone.
Finally a piece of parchment is glued to the bridge over the E string groove, this prevents the thin string from cutting into the bridge.
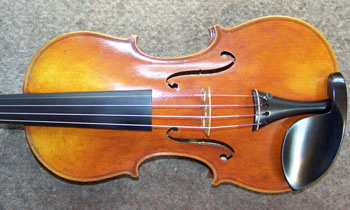 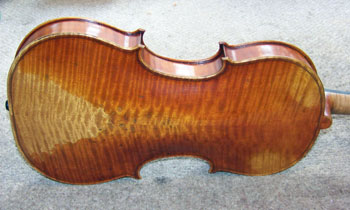
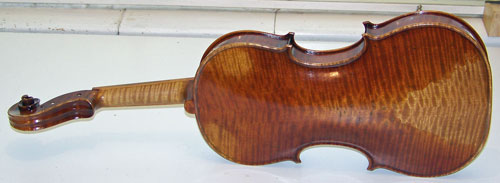
By the time it is ready to play, over 300 hours of work will have gone into making this violin. Hopefully showing the construction in this way will have been of interest, and perhaps shown you things which you didn't know about violins.
|
